When the EXCELUPLOAD element is added to markup, the resulting content will include a specialised uploader designed to convert data from a spreadsheet into an object in session memory. The uploader consists of the following components:
- A Browse button, which opens a file browser for the user to choose the spreadsheet they want to upload.
- A read-only text field that identifies the chosen spreadsheet. This will clear as soon as the file has been uploaded, or if the user clicks the X icon to the right of the file's name.
- A configurable button that causes the chosen spreadsheet to be uploaded.

A spreadsheet uploader.
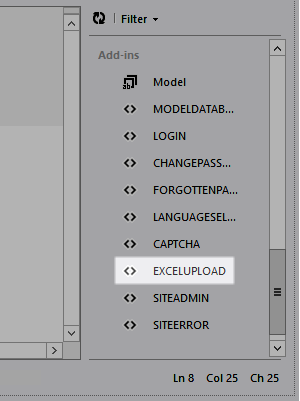
The quickest way to add this type of element is by clicking EXCELUPLOAD within the Tags category of a HTML editor's Element Picker.

Picking the EXCELUPLOAD element tag.
Doing this will create an element with the following syntax:
<%# EXCELUPLOAD(
ButtonText="Select File"
TotalHeaderRows="1"
MaxDisplayedRows="25"
ColumnA="ColumnKeyword|ColumnType"
ColumnB="ColumnKeyword|ColumnType"
ColumnC="ColumnKeyword|ColumnType") %>
This syntax features a number of properties inside the element's parentheses. The order of these properties is not important, as long as you supply a suitable value to each. Each of the following properties overrides one aspect of the uploader's behaviour:
| Property | Description | Default Value |
|---|---|---|
| ButtonText | The label text of the uploader's second button. | Select File |
| TotalHeaderRows | The number of rows in the spreadsheet that you want to treat as headers, counting from the top downwards. Values in header rows will be excluded from the data uploaded to session memory. | 1 |
| MaxDisplayedRows | The maximum number of spreadsheet rows - excluding headers - that you want to import. Any rows after this limit will be ignored. | 25 |
Excluding a property from the element tag will cause its default value to be used.
The example syntax above also includes three Column Definition properties named ColumnA, ColumnB, and ColumnC. Each of these properties identifies a single column in the spreadsheet, and determines how the data in that column will be mapped to your session object. Column definitions use the following syntax:
Column="Keyword|Type|Mandatory"
- Column - The property key itself references the column to be imported. It should be written using the word "Column" followed by the letter or letters that represent the column in the source spreadsheet. For example, to upload data from column B, you would use the property key ColumnB.
- Keyword - This specifies the keyword to be paired with any value retrieved from the column. It should be appropriate for the contents of that column, making any resulting key-value pairs easy to understand. For example, if the column contains a series of birth dates, you might use DOB as its keyword, resulting in data such as "DOB=10/04/1986".
Avoid using keywords already in use elsewhere in your application, unless they are specifically reserved for use with your spreadsheet uploader. Certain functions, including ForEachSessionListItem, make use of the keywords assigned to each column of the uploaded data, and will modify their values during run-time.
- Type - This specifies the type of data stored in the specified column. It can be set to String, Boolean, Integer or Double.
- Mandatory - This determines whether every row of the specified column must contain data. If you set a column as Mandatory then attempt to upload a spreadsheet lacking data in any row of that column, the upload process will fail, no data will be added to the session, and an error message will appear. If you want to allow blank values in the column, omit this qualifier.
In addition to the three default properties and the column definitions described above, the element tag can be given a further property called SessionName, which determines the name of the session item used to store the uploaded data. An example of this is shown below:
<%# EXCELUPLOAD(
ButtonText="Select File"
TotalHeaderRows="1"
MaxDisplayedRows="25"
SessionName="DataSourceUpload"
ColumnA="ColumnKeyword|ColumnType"
...
If the property is omitted, a default value of "DataSourceUpload" will be used.
There is no reason to change the element's SessionName property unless you need to upload data to a specific item in session memory - for example, if you want to use multiple instances of the element to upload more than one spreadsheet during a single session. In cases like this, each individual spreadsheet will need to be uploaded to a different session item.
The following example demonstrates an element featuring every optional property in addition to two column definitions - one mandatory and one optional:
<%# EXCELUPLOAD(
ButtonText="Upload File"
TotalHeaderRows="1"
MaxDisplayedRows="50"
SessionName="ExcelUploader"
ColumnB="Name|String|Mandatory"
ColumnC="Size|Integer") %>
The resulting uploader control will exhibit the following behaviours:
| Property | Value | Resulting Behaviour |
|---|---|---|
| ButtonText | Upload File | The second button in the control will be labelled "Upload File". |
| TotalHeaderRows | 1 | The uploader will treat the first row of the spreadsheet as a header, and extract data starting at the second row. |
| MaxDisplayedRows | 50 | The uploader will extract up to fifty rows of data, ignoring everything after the 51st row. |
| SessionName | ExcelUploader | Data extracted from the spreadsheet will be stored in a session item named ExcelUploader. |
| ColumnB | Name|String|Mandatory | The uploader will pair all values from column B of the spreadsheet with the keyword Name. Each value is treated as a string, and if any rows do not have a value in column B, the entire process will fail. |
| ColumnC | Size|Integer | The uploader will pair all values from column C of the spreadsheet with the keyword Size. Each value is treated as an integer, and missing values are represented by an empty string in the resulting key value pair. |
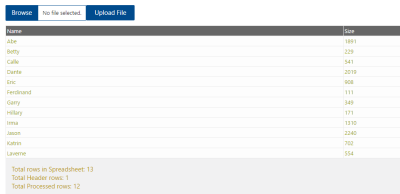
In this example, after selecting a compatible spreadsheet and clicking the Upload File button, the data will be passed into session memory and a tabular representation of the source data will appear below the uploader control.
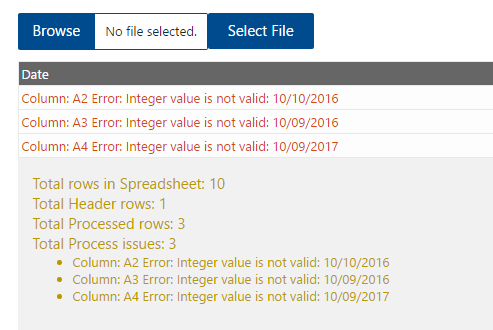
If the upload fails due to one or more errors, a series of messages will appear instead of the table, indicating what went wrong.

The result of a failed upload, including details of the three errors that caused the failure.

