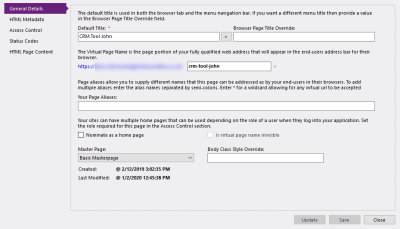
Specify basic information about the selected page, including its name and unique identity.
Implementation:
- Switch to the General Details panel when editing a page.
- In the Default Title field type the name of the page as it will appear throughout the Site Map Inspector, and in your site's navigation menu.
The Browser Page Title Override's text will appear in the title bar and tab label when the selected page is rendered in a web browser. If you leave this field blank the page's default title will be used instead.
- (Optional) Modify the Virtual Page Name as needed.
The Virtual Page Name is a unique string that determines the URL of the page, based on the URL of your site. For example, if this value is set to about and your site is located at http://mysite.com, the full URL of the page will be http://mysite.com/about/.
If a page does not already have a Virtual Page Name, one will be generated automatically when you specify the page's Default Title, using that title as a basis. Since a virtual page name cannot contain spaces, any spaces in the default title will be replaced with hyphens.
- Use the Your Page Aliases field to assign one or more alternative virtual page names - or Aliases - to the page.
- (Optional) Tick the Nominate As A Home Page check box if you want your selected page to be marked as your site's home page. This setting cannot be applied to master pages.
- (Page only) Use the drop-down menu to assign a Master Page to your selected page.
Every standard page must be allocated a master page. The page will inherit certain settings - including header contents, stylesheets, and scripts - from its master page, letting you apply common settings to multiple pages by giving all of them the same master page.
- (Optional) Apply a particular style class to the body of your page. Type its name in the Body Class Style Override field.
The chosen class will override the page's default one, including one applied by the allocated master page.
- (Model Host and Model Data Browser page Only) Select a KnowledgeKube model from your repository to associate it with the selected page.
When editing an existing page you can also see the date and time when the page was Created and Last Modified at the bottom of the window. This also includes the name of the user that created and updated the page.
- (Optional) Click Update to save and publish your changes without closing the active window.
- (Optional) Click Save to publish your changes to the site, and close the active window.

